Designing my own custom 3D Printed Keyboard
Last year (2022) I picked up a new hobby: 3D printing. I had always been interested in the concept of 3D printing but felt I never had a use for them. I didn't want to just get another gadget that would sit around unused in my home.
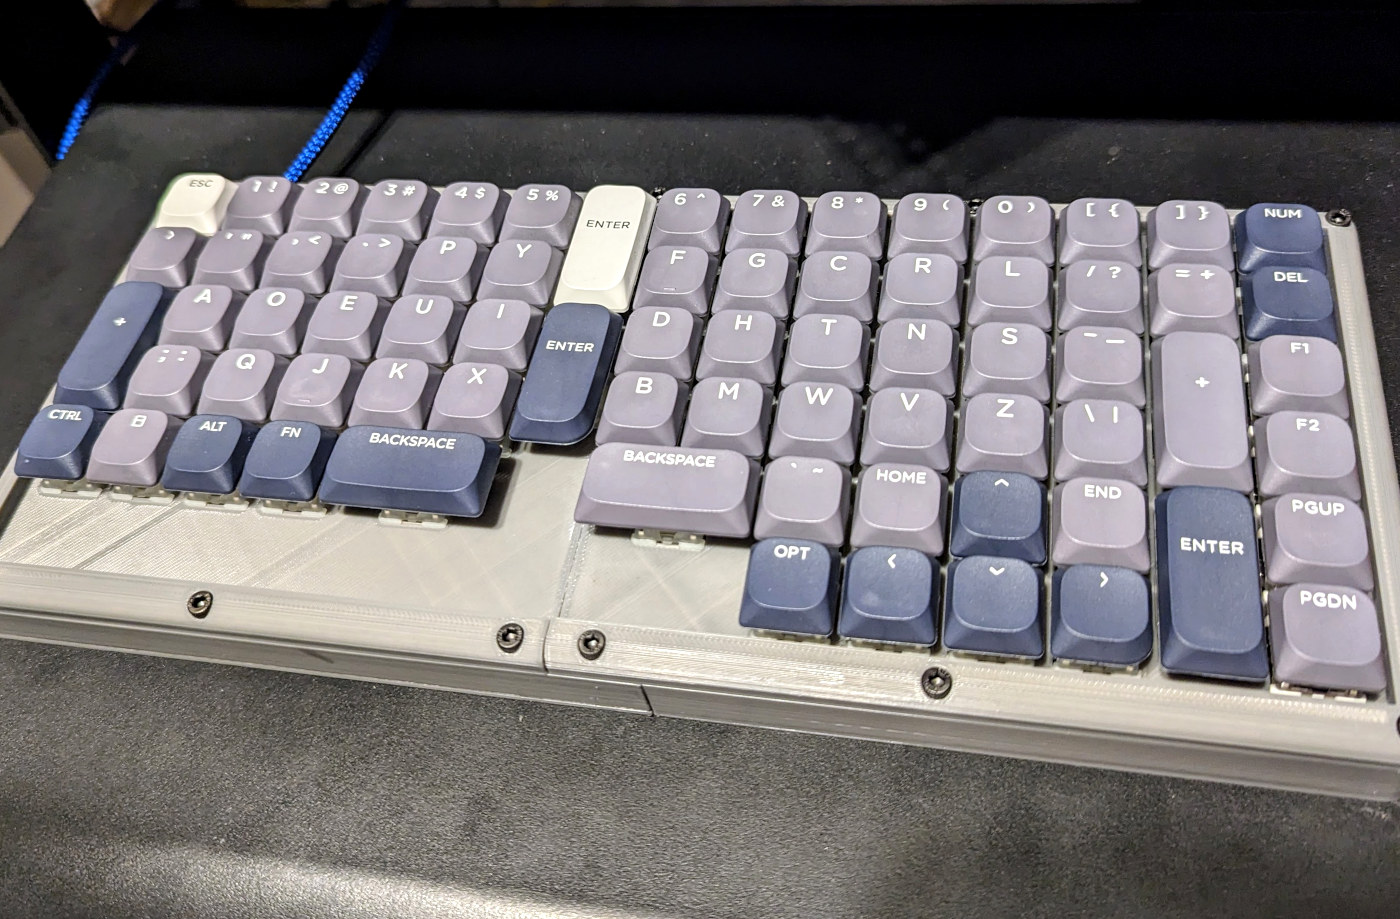
The end result
But what really got me into it was seeing this video on YouTube by a guy named Tech Yesterday. He's a "gadget hackers" that just gets an idea and follows it through no matter how whacky it is. Most of his hacks are gaming focused, so he has put a touchpad on a controller, a joystick onto a mouse, and a joystick on to a keyboard.
This "joystick keyboard" is what really caught my attention. But I'll save that project for another post. What I want to talk about here is my custom printed, hand wired Dvorak keyboard.
The Printer

When did 3D printers get so cheap? I remember them costing $1000 and up. But I saw a deal for a Creality Ender 3 Pro for only $149.99 and jumped on the deal. Later I found out there are better models out there but this does the job with a bit of tweaking, and the price can't be beat.
The Inspiration

For many years I had enjoyed using the TypeMatrix line of keyboards for their compact and efficient design -- vertical columns, backspace/enter in the middle, comfortable integrated numpad with dual labeled keys. However, it's fairly pricey and wasn't built to last. Also, it cannot be reprogrammed with your own firmware. And sadly it seems that TypeMatrix has decided not to update or improve their product in over 15 years.
I saw there was a big custom keyboard building community out there, and since I had familiarized myself with the free Blender 3D software, I decided to take the plunge and build my own keyboard to match the functionality and layout of the TypeMatrix.
The Design
My build was heavily inspired by Mad Mod Labs (build files). However, I wanted mine to have columns of keys and other modifications. So most of the parts I had to create in Blender from scratch in a very pain staking process. Someone who is more proficient with Blender should be able to improve upon this greatly!
The idea was to print this in two main sections and simply glue them together. I even used popsicle sticks with epoxy to reinforce the connection :)
For the plates into which the switches are inserted I used an online tool that converts a keyboard layout JSON file into an SVG vector image that can be imported into Blender.
Key switches: Gateron G Yellow Pro Switches 72 pcs
Keycaps: XVX Low Profile Double Shot Keycaps 144 count
The Wiring
Mad Mod Labs was also incredibly helpful with their detail of the wiring process. I had some ProMicro boards laying around so I decided to use that instead of something like a Raspberry Pico (2040). This turned out to be extra challenging due to the smaller number of data pins available, so I had to add a bunch of jumper wires.
 The rats nest of wiring
 The column and row layout strategy
 ProMicro Pin Diagram
As you can see from the photos above, there's a total of 7 "rows" in the keyboard, with the 6th row actually being on the right side, and the 7th row being an odd assortment of leftover keys. There's only 18 data pins to work with -- though I think this can be "hacked" to a total of 20 pins -- and each column and each row need a separate pin. So for example, you could make a layout of 12 keys across and 6 rows (12 + 6 = 18), or 11 + 7, or 10 + 8. I went with 11 x 7.
It took a very long time to solder and connect every switch. But when it all was connected and tested working, I sealed it all up with the M3 nuts and bolts, making sure nothing was pinched. Oh actually, before the final assembly I flashed it with basic QMK firmware so that I could activate the flashing mode later with a key combination.
The QMK Firmware
QMK is an amazing piece of software used for powering microcontrollers in custom keyboards. Pretty much everything about it can be customized. The most challenging thing here was learning how to work my odd frankenstein keyboard wiring pattern into an easier to digest layout in code, so it would be easier to maintain and customize. QMK has evolved over the years so there was a lot of docs out there that didn't necessarily reflect the current state of things; you could use pure .c and .h files, or you could use the newer style JSON configs. In the end I went with a hybrid approach, I'll post the changed code on GitHub.
Conclusion
I've been using this keyboard as a daily driver now for a few months and it's great; even better than the TypeMatrix. If a key goes bad I can replace it without much trouble. It's all soldered though, so I think the next logical improvement from here would be to build a keyboard from laser cut parts, and use a custom printed circuit board with hot swap switches so there are much fewer components to solder.
I can't wait to work on Version 2!
You can download the 3D STL files for this keyboard at Printables
This article, and all articles on this blog, were written without the use of any AI, GPT, or Language Learning Models. It's old fashioned I guess.